WordPressを入れてブログを始めるための方法~準備編~
さぁVPSを契約してドメインも契約しましたので、ブログを立ち上げたいと思います。
ブログはご存知WordPressです。
レンタルサーバの場合は簡単インストールみたいな感じで、おそらく契約したらすぐ使えるようになると思いますが、これでも一応SEの端くれ。
構成要素、必要な機能を理解して、コマンドを実際に打ち込んで自分の知識として蓄積していきましょう!
今回はWordPress導入の下準備になります。
ブログの構成要素
ブログを立ち上げるためにはブログのアプリケーションが必要です。
今回はWordPress一択です。
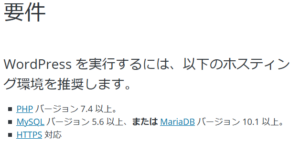
WordPress公式によると実行するのに必要な要件は次のとおりです。!

→公式ページ
PHPはサーバー側で動的なウェブページを作成できるプログラミング言語です。
WordPressを動かすのに必要です。データベースとの連携も担います。
ブログ情報を蓄積するデータベースが必要で、MariaDBを使用します。理由は後述。
最後にブログやHPなどを公開する機能としてWebサーバソフトが必要です。
今回はWebサーバソフトとしていちばん有名なApacheではなく、Nginxにしたいと思います。
インストールする順序は単独で動作する順序で、Webサーバソフト→データベース→WordPressの順になります。
Webサーバを入れる
Webサーバとは
Webサーバは以下の役割を担っています。
- サイト閲覧者のリクエストに応じて、サーバに保管しているデータを返却・応答する
- Webサイトにドメインでアクセスできるよう、DNSサーバと連携する
- サイト閲覧者が間違ったリクエストを送ってきた場合には、誤ったリクエストであることを返却する。
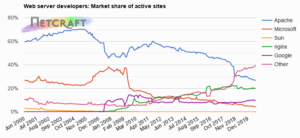
Webサーバとして最も有名なものは、Apache(アパッチ)です。

出典:https://news.netcraft.com/archives/2020/08/26/august-2020-web-server-survey.html → リンク切れです。
Webサーバのシェアは以前はApacheが7割ほどに迫っていましたが、徐々に他のソフトウェアのシェアが増えてきています。
Otherはさておき、Nginx、Googleが増えてきています。
今回インストールするNginxは次のような特徴があります。
- Apacheと同じオープンソースソフトウェア
- 高い処理性能と並行処理能力を持っている
- メモリ消費が少ない
ApacheはシェアNo.1ということもあり、Web上に情報が溢れています。
何かトラブルが発生しても、検索すればきっと解決できるという安心感があります。
一方でNginx、少し前は情報が少なかったのですが、近年のシェアを見てもわかる通り、利用者が増えるに連れ、Web上の情報も増えてきています。
基本的な設定方法も検索したらたくさん出てくるようになったので、勉強も兼ねてNginx導入にチャレンジです。
Nginxのインストール
さぁ早速やっていきます。
まずはインストール。
$ sudo su -
# yum install nginx

Is this ok [y/N]: と聞かれます。
# y

Complete!
と返ってきたら、インストールは完了です。
とりあえず、動かしてみます。
# systemctl start nginx

Active: active (running) と出たら無事に起動しています。
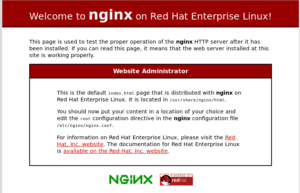
ブラウザで、http://[IPアドレス]を入力して表示してみます。

こんな感じで、Welcome to nginx と表示されるはずです。
ちなみに上の画像は、CentOS 8でインストールしたときの初期画面になります。
今の状態はインストール→起動をした状態で、サーバの再起動などした際には、自動で起動されない状態です。
運用を始めたら、滅多にサーバー再起動をすることは無いですが、これからインストールなどで何度も再起動したりします。
サーバーが立ち上がった際、自動的にnginxサービスを起動するように設定を変更します。
コマンドはこちら。
# systemctl enable nginx

Created symlink /etc/systemd/system/multi-user.target.wants/nginx.service → /usr/lib/systemd/system/nginx.service.
上記が返ってきたら、設定変更完了です。
設定の状態を確認する場合は以下のコマンドです。
# systemctl status nginx

● nginx.service - The nginx HTTP and reverse proxy server
   Loaded: loaded (/usr/lib/systemd/system/nginx.service; enabled; vendor prese>
  Drop-In: /usr/lib/systemd/system/nginx.service.d
           mqphp-fpm.conf
   Active: active (running) since Sat 2020-10-17 17:46:10 JST; 1 months 1 days >
  Process: 893 ExecStart=/usr/sbin/nginx (code=exited, status=0/SUCCESS)
enabledと出ていたら、自動起動の設定になっています。
Active: active (running)と表示されたら、正常に動いていることを表しています。
Web上に公開されるとセキュリティが心配・・・。
firewallの設定で変更を推奨されている項目があるので、ついでに設定しておきます。
/etc/firewalld/firewalld.confファイルを変更します。
AllowZoneDrifting=yes
→
AllowZoneDrifting=no
firewallの設定を変更したら、念の為、設定を反映するため、firewallを再起動しておきます。
再起動したら合わせてステータスも確認しておきましょう。
# systemctl restart firewalld
# systemctl status firewalld
Webページはhttpまたはhttpsでアクセスされますので、そちらを許可しておきます。
●ポート開放状況を事前に確認
# firewall-cmd --list-all

●httpとhttpsサービスを許可
# firewall-cmd --permanent --zone=public --add-service=http
# firewall-cmd --permanent --zone=public --add-service=https

●ファイアウォール再起動
# systemctl restart firewalld

●変更後の確認
# firewall-cmd --list-all
public (active)
  ~~省略~~
  services: cockpit dhcpv6-client http https smtp ssh
  ~~省略~~
サービスが起動している間は/var/log/nginxの下に、access.log、error.logというファイルが作成されます。
シンプルにサービスを起動しただけなので、何もエラーは出ないはずですが、何故か次のようなエラーが出ていました。
[error] ~~~ favicon.ico failed (2: No such file or directory)
faviconのファイルが開けずエラーとなったようです。
対処しなくても問題ないですが、必要なエラーを見過ごす可能性があるため、エラーは解消しておきましょう。
編集対象のファイルは、/etc/nginx/nginx.confです。
serverディレクティブの箇所に、以下を追記します。(location~)
server {
        location = /favicon.ico {
            log_not_found off;
        }
}
設定ファイルを変更した場合、文法チェックを行います。
# nginx -t
問題ない場合は、リロードまたはサービスの再起動を行います。
# systemctl reload nginx
または
# systemctl restart nginx
SSL化
Webサーバを立ち上げたので、http://ドメイン名 でHPにアクセスできるようになりました。
このままでもとくに問題はありませんが、Googleも推奨しているサイトのSSL化を先に設定しておこうと思います。
SSLはSecure Sockets Layerの略で、インターネット上の通信を暗号化する仕組みのことです。
つまり、サイトのSSL化とは、サイトとサイト訪問者間の通信を暗号化することです。
WordPress導入後でもSSL化は可能ですが、何かと設定が面倒でしたので、WordPressを入れる前にSSL化しておくことをオススメします。
※私はWordPress導入後にSSL化をしましたが、何かと調べることが多く大変手間でした。。
Certbot
サイトのSSL化にはCertbotというツールを使います。
- 無料かつ自動でSSL証明書を発行
- CSRとKEYファイルの作成
- Webサーバ側の設定
上記の内容を自動で行ってくれます。
通常、証明書には有効期限がありますが、後述するcron(クーロン)設定を行っておくと、証明書の更新も自動化が可能です。
インストール手順
●インストールリポジトリを追加
# dnf install -y epel-release
Last metadata expiration check: 0:08:11 ago on Thu 10 Sep 2020 11:57:43 PM JST.
Package epel-release-8-8.el8.noarch is already installed.
Dependencies resolved.
Nothing to do.
Complete!

●certbotを追加
# dnf install certbot python3-certbot-nginx
Last metadata expiration check: 0:08:27 ago on Thu 10 Sep 2020 11:57:43 PM JST.
Dependencies resolved.
================================================================================
 Package                   Arch   Version                       Repo       Size
================================================================================
Installing:
 certbot                   noarch 1.7.0-1.el8                   epel       48 k
 python3-certbot-nginx     noarch 1.7.0-1.el8                   epel       81 k
Installing dependencies:
 python3-acme              noarch 1.7.0-1.el8                   epel       87 k
~~~中略~~~
Transaction Summary
================================================================================
Install  18 Packages

Total download size: 2.0 M
Installed size: 7.8 M
Is this ok [y/N]:y *yesを入力
Downloading Packages:
                         [===                 ] ---  B/s |   0  B     --:-- ETA                    100% [====================] 1.4 kB/s | 676  B     00:00 ETA
(2-3/18): python3-py  4% [-                   ] 2.2 MB/s | 101 kB     00:00 ETA(2/18): python3-pyasn1-0.3.7-6.el8.noarch.rpm   1.8 MB/s | 126 kB     00:00
(3-4/18): python3-py 13% [==-                 ] 2.2 MB/s | 275 kB     00:00 ETA(3/18): python3-pyOpenSSL-18.0.0-1.el8.noarch.r 1.3 MB/s | 103 kB     00:00
~~~中略~~~
(18/18): python3-zop 93% [==================- ] 2.5 MB/s | 1.9 MB     00:00 ETA(18/18): python3-zope-component-4.3.0-8.el8.noa 5.9 MB/s | 313 kB     00:00
--------------------------------------------------------------------------------
Total                                           1.4 MB/s | 2.0 MB     00:01
warning: /var/cache/dnf/epel-6519ee669354a484/packages/certbot-1.7.0-1.el8.noarch.rpm: Header V4 RSA/SHA256 Signature, key ID 2f86d6a1: NOKEY
Extra Packages for E     [===                 ] ---  B/s |   0  B     --:-- ETAExtra Packages for Enterprise Linux 8 - x86_64  1.6 MB/s | 1.6 kB     00:00
Importing GPG key 0x2F86D6A1:
 Userid     : "Fedora EPEL (8) <epel@fedoraproject.org>"
 Fingerprint: 94E2 79EB 8D8F 25B2 1810 ADF1 21EA 45AB 2F86 D6A1
 From       : /etc/pki/rpm-gpg/RPM-GPG-KEY-EPEL-8
Is this ok [y/N]: y *yesを入力
Key imported successfully
Running transaction check
Transaction check succeeded.
~~~中略~~~
  python3-zope-component-4.3.0-8.el8.noarch
  python3-zope-event-4.2.0-12.el8.noarch
  python3-zope-interface-4.6.0-1.el8.x86_64

Complete!
証明書を発行
●証明書発行
# certbot --nginx
Saving debug log to /var/log/letsencrypt/letsencrypt.log
Plugins selected: Authenticator nginx, Installer nginx
Enter email address (used for urgent renewal and security notices)
 (Enter 'c' to cancel): *メールアドレスを入力

- - - - - - - - - - - - - - - - - - - - - - - - - - - - - - - - - - - - - - - -
Please read the Terms of Service at
'https://letsencrypt.org/documents/LE-SA-v1.2-November-15-2017.pdf'. You must
agree in order to register with the ACME server at
'https://acme-v02.api.letsencrypt.org/directory'
- - - - - - - - - - - - - - - - - - - - - - - - - - - - - - - - - - - - - - - -
(A)gree/(C)ancel: A *Agreeを入力

- - - - - - - - - - - - - - - - - - - - - - - - - - - - - - - - - - - - - - - -
Would you be willing, once your first certificate is successfully issued, to
share your email address with the Electronic Frontier Foundation, a founding
partner of the Let's Encrypt project and the non-profit organization that
develops Certbot? We'd like to send you email about our work encrypting the web,
EFF news, campaigns, and ways to support digital freedom.
- - - - - - - - - - - - - - - - - - - - - - - - - - - - - - - - - - - - - - - -
(Y)es/(N)o: N *Let's Encryptプロジェクトからのメールを受け取るかどうか。不要なのでNoを入力。
No names were found in your configuration files. Please enter in your domain
name(s) (comma and/or space separated)  (Enter 'c' to cancel): *名前を入力。ドメイン名で良い
Obtaining a new certificate
Performing the following challenges:
http-01 challenge for [ドメイン名]
Waiting for verification...
Cleaning up challenges
Deploying Certificate to VirtualHost /etc/nginx/nginx.conf
Redirecting all traffic on port 80 to ssl in /etc/nginx/nginx.conf

- - - - - - - - - - - - - - - - - - - - - - - - - - - - - - - - - - - - - - - -
Congratulations! You have successfully enabled https://[ドメイン名]
- - - - - - - - - - - - - - - - - - - - - - - - - - - - - - - - - - - - - - - -

IMPORTANT NOTES:
 - Congratulations! Your certificate and chain have been saved at:
   /etc/letsencrypt/live/[ドメイン名]/fullchain.pem
   Your key file has been saved at:
   /etc/letsencrypt/live/[ドメイン名]/privkey.pem
   Your cert will expire on 2020-12-09. To obtain a new or tweaked
   version of this certificate in the future, simply run certbot again
   with the "certonly" option. To non-interactively renew *all* of
   your certificates, run "certbot renew"
 - Your account credentials have been saved in your Certbot
   configuration directory at /etc/letsencrypt. You should make a
   secure backup of this folder now. This configuration directory will
   also contain certificates and private keys obtained by Certbot so
   making regular backups of this folder is ideal.
 - If you like Certbot, please consider supporting our work by:

   Donating to ISRG / Let's Encrypt:   https://letsencrypt.org/donate
   Donating to EFF:                    https://eff.org/donate-le

と、ここまで来たら無事に証明書発行は完了です。
Your cert will expire on 2020-12-09.と記載があるように、2020年12月9日で証明書は期限切れになってしまいます。
そのためcron設定を行っておきます。
●cron登録
# echo "0 0,12 * * * root python3 -c 'import random; import time; time.sleep(random.random() * 3600)' && certbot renew -q" | sudo tee -a /etc/crontab > /dev/null
これで、定期的に証明書が更新されますので、常にサイトがSSL化された状態になります。
DBを入れる
次はブログの情報を蓄積するためにデータベースを導入します。
データベースは有料ものだと、Oracle、Microsoft SQL Server、IBM Db2。
無料もの(OSS=Open Source Software)だと、MySQL、PostgreSQL、SQLite、MariaDB、MongoDB、Elasticsearchあたりでしょうか。
データベースは大きく分けて、RDBMS(Relational DataBase Management System)と、NoSQLとあります。今回はRDBMSとしての機能が必要です。
データベースとしてはMySQLが有名ですが、OracleがMariaDBへの移行を推奨しているので、最初からMariaDBにしておきます。
MariaDBインストール
# yum install mariadb-server mariadb -y
はい。これだけ。yumコマンドでmariadb-serverとmariadbをインストールする。途中の質問は「y=yes」を指定します。
インストールしたら、自動起動設定をします。
# systemctl enable mariadb
とりあえず動かしましょう。
# systemctl start mariadb
MariaDB初期設定の手順
# mysql_secure_installation

NOTE: RUNNING ALL PARTS OF THIS SCRIPT IS RECOMMENDED FOR ALL MariaDB
      SERVERS IN PRODUCTION USE!  PLEASE READ EACH STEP CAREFULLY!

In order to log into MariaDB to secure it, we'll need the current
password for the root user.  If you've just installed MariaDB, and
you haven't set the root password yet, the password will be blank,
so you should just press enter here.

Enter current password for root (enter for none):
OK, successfully used password, moving on...

Setting the root password ensures that nobody can log into the MariaDB
root user without the proper authorisation.

●rootのパスワードを設定するか?
Set root password? [Y/n] Y *設定するのでYを入力
New password:         *任意で入力
Re-enter new password:    *同じものを入力
Password updated successfully!
Reloading privilege tables..
 ... Success!

By default, a MariaDB installation has an anonymous user, allowing anyone
to log into MariaDB without having to have a user account created for
them.  This is intended only for testing, and to make the installation
go a bit smoother.  You should remove them before moving into a
production environment.

●誰でもログインできるユーザーを削除するか?
Remove anonymous users? [Y/n] Y *セキュリティ向上のため削除する→Y入力
 ... Success!

Normally, root should only be allowed to connect from 'localhost'.  This
ensures that someone cannot guess at the root password from the network.

●リモートでのrootログインを不許可にするか?
Disallow root login remotely? [Y/n] Y *セキュリティ向上のためリモートログインは不可にする→Y入力
 ... Success!

By default, MariaDB comes with a database named 'test' that anyone can
access.  This is also intended only for testing, and should be removed
before moving into a production environment.

●テストデータベース(元からあるテーブル群)を削除するか?
Remove test database and access to it? [Y/n] Y *不要なのでY入力
 - Dropping test database...
 ... Success!
 - Removing privileges on test database...
 ... Success!

Reloading the privilege tables will ensure that all changes made so far
will take effect immediately.

●権限の変更をリロードするか?
Reload privilege tables now? [Y/n] Y *リロードするのでY入力
 ... Success!

Cleaning up...

All done!  If you've completed all of the above steps, your MariaDB
installation should now be secure.

Thanks for using MariaDB!
DBにつないでみる
# mysql -u root -p
Enter password:  *設定したパスワードを入力
Welcome to the MariaDB monitor.  Commands end with ; or \g.
Your MariaDB connection id is 16
Server version: 10.3.17-MariaDB MariaDB Server

Copyright (c) 2000, 2018, Oracle, MariaDB Corporation Ab and others.

Type 'help;' or '\h' for help. Type '\c' to clear the current input statement.

MariaDB [(none)]>  *こんな感じにプロンプトが変わればDBに接続できたってこと。

●試しにデータベースを見てみます。
MariaDB [(none)]> show databases;
+--------------------+
| Database           |
+--------------------+
| information_schema |
| mysql              |
| performance_schema |
+--------------------+
3 rows in set (0.000 sec)

●データベースを作って見ます。
MariaDB [(none)]> create database conoha;
Query OK, 1 row affected (0.000 sec)

MariaDB [(none)]> show databases;
+--------------------+
| Database           |
+--------------------+
| conoha             |*conohaというデータベースが出来ました
| information_schema |
| mysql              |
| performance_schema |
+--------------------+
4 rows in set (0.001 sec)

●要らないので消しますw
MariaDB [(none)]> drop database conoha;
Query OK, 0 rows affected (0.002 sec)

MariaDB [(none)]>
MariaDB [(none)]> show databases;
+--------------------+
| Database           |
+--------------------+
| information_schema |
| mysql              |
| performance_schema |
+--------------------+
3 rows in set (0.000 sec)

●消えたのでデータベースから切断
MariaDB [(none)]> exit
Bye
#
文字コード設定
# vi /etc/my.cnf.d/server.conf
  [mariadb]
    character-set-server = utf8mb4

# vi /etc/my.cnf.d/client.conf
  [client-mariadb]
    default-character-set = utf8mb4

# systemctl restart mariadb

#  mysql -u root -p
MariaDB [(none)]> show variables like "chara%";
PHPインストール
インストール手順
PHPはWordPressを動かすために必要になりますので、以下のコマンドでインストールします。
インストールと有効化はセットでおこなっておきます。
# yum install php php-mysqlnd php-fpm php-opcache php-gd php-xml php-mbstring -y

# systemctl enable php-fpm

# systemctl restart php-fpm
設定変更
今回はApacheではなく、Nginxを使うので、WebサーバとPHPの連携設定を変更します。
1つ目は/etc/php-fpm.d/www.confです。
変更内容は所有者とグループの変更。
デフォルト値はapacheなので、nginxに変更します。
# diff www.conf www.conf.20200906
24,25c24
< user = nginx
---
> user = apache
27,28c26
< group = nginx
---
> group = apache
#
2つ目は/etc/php.iniです。
変更内容は以下の通り。
- PHPタグの短縮記法を有効にする
- アップロードするデータのMAXサイズを128MBにする
- アップロードするファイルのMAXサイズを128MBにする
# diff php.ini php.ini.20200906
187,188c197
< short_open_tag = On
---
> short_open_tag = Off
695,696c672
< post_max_size = 128M
---
> post_max_size = 8M
848,849c825
< upload_max_filesize = 128M
---
> upload_max_filesize = 2M
#
最後に再起動して設定を反映。
# systemctl restart nginx
# systemctl restart php-fpm
まとめ
長くなってきたので、準備と本体導入を分けました。
まっさらなサーバーに導入する場合、比較的ネットで探したコマンドをポチポチ入れていけば、インストールできますが、たまにバージョン違いなどで想定した結果にならないことも、案外あります。
エラー文をコピペして検索することも多いので、記事でなるべく実際のコマンドとコマンド結果を記載しました。
似たようなエラーで躓く人の助けになれば幸いです。


コメント